Load Balancing and High Availability Options for Amazon RDS
Amazon RDS를 위한 부하분산과 고가용성
A guide on how to make the RDS database highly available and load balance database requests using read and write request splitting.
읽기와 쓰기 요청 분산을 사용하여 RDS 데이터베이스를 고가용성으로 만들고 데이터베이스 요청을 로드밸런싱하는 방법에 대한 가이드입니다.

For readers who have known me through my articles and book in this article, I am going to digress from my usual topics around data engineering, data science, or data analytics. Instead, I am going to talk about a subject that I used to specialize in over many years in the past — Database migrations and modernization.
저의 게시글들과 이 게시글 내의 책을 통해 저를 알고 있는 독자들을 위해 설명하면 그동안 제가 일반적으로 다뤄왔던 데이터 엔지니어링나 데이터 사이언스, 데이터 분석과 관련된 주제에서 벗어날 예정입니다. 대신에 과거 수년 동안 전문적으로 다루었던 주제인 데이터베이스 마이그레이션과 모더나이제이션에 대해 얘기해보려고 합니다.
Lately, I have seen a huge upsurge of requests coming from our clients who want to migrate their on-premise databases to the cloud. The most common reasons for migrating databases to the cloud are simplified administration tasks, automated patching & backups, high availability, and high scalability.
최근에 저는 온프레미스 데이터베이스를 클라우드로 이전하려는 클라이언트의 요청이 크게 급증하는 것을 보았습니다. 클라우드로 데이터베이스를 이전하고자 하는 가장 공통적인 이유는 단순화된 운영 업무, 자동 패치와 백업, 고가용성, 높은 확장성이었습니다.
All reasons cited above are indeed true but…there is a catch. I am not going to bother talking about simplified administration tasks, automated patching & backups because by default these features are truly embedded within the cloud service . However features like high availability and high scalability require you to setup and configure a few extra items.
위에 언급된 모든 이유들은 사실이지만... 함정이 있습니다. 단순화된 운영 업무와 자동 패치 및 백업은 기본적으로 클라우드 서비스 내에 잘 내재되어 있기 때문에 이에 대해서는 다루지 않을 예정입니다. 하지만 고가용성과 높은 확장성과 같은 기능을 사용하려면 몇가지 추가 항목을 설정하고 구성해야 합니다.
It’s often suggested that choosing the right tool makes the most complex jobs look easy. The focus of this article is to equip the reader with the knowledge of some options that are available for enabling high availability and high scalability of your Amazon RDS. As we go along I will also point out the common pitfalls to protect yourself against.
올바른 도구를 선택하면 가장 복잡했던 작업이 쉽게될 수 있기 때문에 종종 제안 됩니다. 이 게시글의 초점은 독자들이 Amazon RDS의 고가용성과 높은 확장성을 구현하는데 사용할 수 있는 몇가지 옵션에 대한 지식을 제공하는 것입니다. 진행하면서 자신을 보호하기 위한 일반적인 함정들에 대해서도 언급할 것입니다.
For assumption sake, throughout this article, I am going to focus on Amazon RDS, although the same principles apply to any other data service from other cloud providers.
가정을 위해 이 게시글 내내 Amazon RDS에 초점을 맞출 것이지만 동일한 원칙이 다른 클라우드 공급자의 다른 데이터 서비스에도 적용됩니다.
High Availability — How to protect against instance failures?
고가용성 - 어떻게 인스턴스의 실패에 대응할 것인가요?
For several years the de facto standard for making Amazon RDS highly available has been by using Multi-AZ deployments. Multi-AZ deployments come in two flavors:
몇년간 Amazon RDS의 고가용성을 위한 사실상 표준은 멀티 AZ 배포를 사용하는 것이었습니다. 멀티 AZ 배포에는 두가지 유형이 있습니다.
Multi-AZ DB instance deployment
멀티 AZ DB 인스턴스 배포
In this type of deployment, failover support is provided using a master and a standby database instance. All read and write requests are sent to the master instance using an RDS endpoint created during the setup of RDS. The standby instance replicates changes from the master but does not serve any traffic (read or write).
이 배포 유형에서는 하나의 마스터와 하나의 스탠바이 데이터베이스 인스턴스를 사용하여 장애 조치 지원이 제공됩니다. 모든 읽기와 쓰기 요청들은 RDS의 구성 중 생성되는 하나의 RDS 엔드포인트를 사용하여 마스터 인스턴스로 보내집니다. 스탠바이 인스턴스는 마스터로부터 변경되는 것들을 복제하지만 트래픽(읽기와 쓰기)이 전달되지는 않습니다.
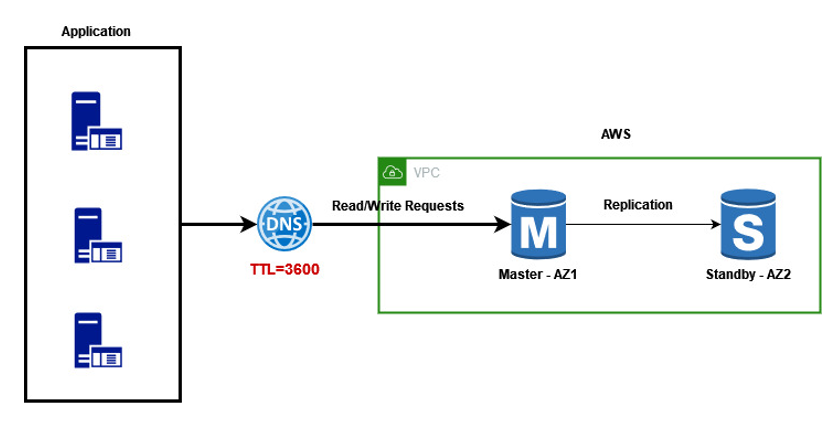
The standby instance is by default created in a different availability zone than the master instance. This is done intentionally to cover against downtime related to the entire availability zone failure.
스탠바이 인스턴스는 기본적으로 마스터 인스턴스와는 다른 가용 영역에 생성됩니다. 가용영역 전체가 장애가 나더라도 다운타임이 발생하지 않도록 의도적으로 수행되는 것입니다.
At failover, the standby instance assumes the role of the master, at this point all read and write traffic are automatically routed to the standby instance.
장애 조치 시 스탠바이 인스턴스는 마스터로 역할을 맡게되고 이 시점에 모든 읽기와 쓰기 트래픽은 자동으로 스탠바이 인스턴스로 라우팅됩니다.

The Multi-AZ DB instance deployment is pretty easy to understand and set up but there is one gotcha.
At the time of failover RDS switches the role of master with standby instance. This means the IP address associated with the RDS endpoint changes in the background. Now here is a problem — many a times the domain name servers (DNS) and/or Java virtual machines (JVM) settings are configured with high time-to-live (TTL) value. In simple terms DNS will cache the IP address in memory for a period of time=TTL. A higher TTL means that the applications are unaware of the failover until the expiry of TTL — this could lead to downtime
멀티 AZ DB 인스턴스 배포는 이해와 구성이 정말 쉽지만 한가지 운에 맡겨야하는 부분이 있습니다.
RDS의 장애 조치 시점에 스탠바이 인스턴스가 마스터의 역할로 전환되고, 이는 곧 RDS 엔드포인트에 연결된 IP 주소가 뒷단에서 변경된다는 의미입니다. 여기에는 한가지 문제가 있습니다. 대부분 도메인 네임서버와 자바 가상머신 설정은 높은 time-to-live (TTL) 값으로 구성됩니다. 간단히 말해서 DNS는 TTL 시간 동안 메모리에 IP 주소를 캐시하게 됩니다. 애플리케이션이 TTL이 만료될 때까지 장애 조치를 인지하지 못한다는 것을 의미하고, 이는 다운타입으로 이어질 수 있습니다.
What is the solution? — For Multi-AZ DB instance deployments it is a good idea to configure a low TTL value. Typically, a TTL of 60 seconds is recommended.
해결 방법은 무엇일까요? - 멀티 AZ DB 인스턴스 배포를 위해 낮은 TTL 값을 설정하는 것은 좋은 방법이며 일반적으로 60초를 권장합니다.
Multi-AZ DB cluster deployments (preview)
멀티 AZ DB 클러스터 배포 (preview)
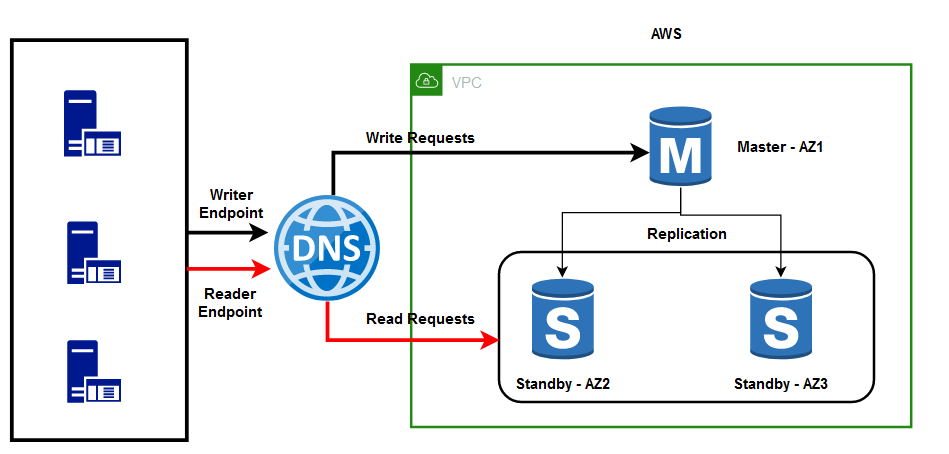
The newest addition to RDS deployment mode is Multi-AZ DB cluster deployment (still in preview). This high availability deployment mode comes with one writer DB instance and two readable standby DB instances, all deployed in separate availability zones within the same AWS Region.
최근에 추가된 RDS 배포 모드는 멀티 AZ DB 클러스터 배포입니다(아직 프리뷰 상태). 이 고가용성 배포 모드는 하나의 writer DB 인스턴스와 두개의 읽기 가능한 스탠바이 DB 인스턴스이며, 모두 동일한 AWS 리전 내 별도의 가용영역으로 배포됩니다.
Multi-AZ DB cluster deployments expose two endpoints:
멀티 AZ DB 클러스터 배포는 두개의 엔드포인트를 제공합니다.
Cluster/Writer Endpoint — The application can use this to connect to the master instance that is writable.
Reader Endpoint — The application can use this to connect to the reader instance with load-balancing support.
클러스터/Writer 엔드포인트 - 애플리케이션은 쓰기 작업을 위해 마스터 인스턴스에 연결하는데 이를 사용할 수 있습니다.
Reader 엔드포인트 - 애플리케이션은 부하 분산을 지원하기 위한 reader 인스턴스로 연결하는데 이를 사용할 수 있습니다.
The Multi-AZ DB cluster deployment is certainly a step in the right direction but suffers from some drawbacks as under:
멀티 AZ DB 클러스터 배포는 확실히 올바른 방향으로 나아가는 단계이지만 다음과 같은 몇가지 단점이 존재합니다.
Load Balancing
The tremendous growth in the eCommerce sector is forcing websites to perform faster so that more transactions can be done in less time. Faster transactions also lead to a better customer experience. So how can we make transactions faster in a world where the traffic patterns evolve over time. A common method employed on the database side is known as read and write request splitting. In a typical application, the read-to-write ratio is 80/20. This means we can make read transactions perform better, we can make the overall experience a lot better. To do this we require not one but multiple reader instances working in a load-balanced formation. Let us explore a couple of options to do this:
로드 밸런싱
이커머스 분야의 엄청난 성장으로 인해 웹사이트가 더 빠르게 수행되어 더 많은 트랜잭션을 더 짧은 시간에 수행할 수 있게 되었습니다. 더 빠른 트랜잭션은 더 나은 고객 경험으로 이어집니다. 트래픽 패턴이 시간이 지남에 따라 진화하는 세상에서 어떻게 더 빠르게 트랜잭션을 만들 수 있을까요? 데이터베이스 측면에서 선택된 한가지 공통적인 방법은 읽기와 쓰기 요청을 분산하는 것으로 알려져 있습니. 일반적인 애플리케이션에서 읽기-쓰기 비율은 80/20 입니다. 이는 읽기 트랜잭션의 성능을 향상시켜서 전반적인 경험을 훨씬 더 좋게 만들 수 있음을 의미합니다. 이렇게 하려면 로드밸런싱된 구성에서 작동하는 하나가 아닌 여러개의 reader 인스턴스가 필요합니다. 몇가지 옵션에 대해 알아봅시다.
Option 1 — What if the application requires even higher read scalability?
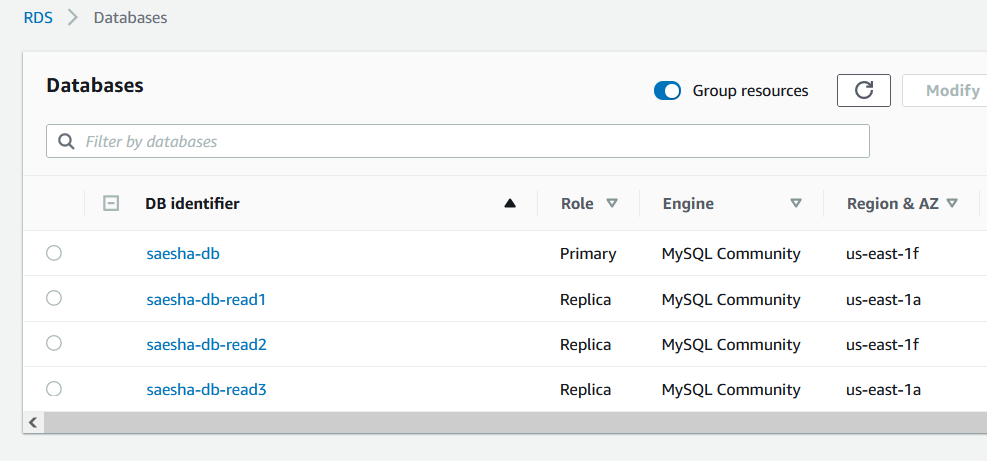
To explain the concept better the example below is based on a fictitious eCommerce website with the domain saesha.ca (Saesha is the name of my daughter who wants to start her own online business one day). The eCommerce site has seen an increase in traffic and wants to scale the read requests. For this purpose we can create an RDS cluster farm that looks like this:
옵션 1 - 애플리케이션에 더 높은 읽기 확장성이 필요한 경우에는 어떻게 해야할까요?
개념을 더 잘 설명하기 위해 아래 예제에서는 saesha.ca 도메인의 가상의 이커머스 웹사이트를 기반으로 합니다(Saesha는 언젠가 자신의 온라인 비즈니스 사업을 시작하려는 제 딸의 이름입니다). 이커머스 사이트는 트래픽이 증가하여 읽기 요청에 대한 확장을 하려고 합니다. 이 목표를 위해 우리는 다음과 같은 RDS 클러스터 팜을 생성할 수 있습니다.
1 Multi-AZ DB instance (master and standby)— saesha-db
3 Read Replicas — saesha-db-read1, saesha-db-read2 and saesha-db-read3
1개의 멀티 AZ DB 인스턴스 (마스터와 스탠바이) — saesha-db
3개의 읽기 복제본 — saesha-db-read1, saesha-db-read2, saesha-db-read3
The idea is to scale database requests by sending read requests to multiple Amazon RDS instances. To do this we need to bring Amazon Route 53 into the equation. Using Amazon Route 53 you can create two separate DNS entries to split read and write requests.
이 아이디어는 다수의 Amazon RDS 인스턴스들로 읽기 요청을 전송하여 데이터베이스의 요청을 확장하는 것입니다. 이렇게 하려면 Amazon Route53이 필요합니다. Amazon Route 53을 사용하면 두개의 개별 DNS 엔트리를 생성하여 읽기와 쓰기 요청을 분할할 수 있습니다.

The process starts by creating a hosted zone (saesha.ca) in Amazon Route 53. Here we have created 2 CNAME records in the saesha.ca hosted zone:
이 절차는 Amazon Route 53에서 하나의 호스트존(saesha.ca)을 생성하는 것으로 시작합니다. 아래와 같이 saesha.ca 호스트 존에 2개의 CNAME 레코드를 생성하였습니다.
- rds_write.saesha.ca — sends write requests to the currently active master
- rds_read.saesha.ca — sends read requests to three (or more in the future) read replicas
- rds_write.saesha.ca — 현재 활성화된 마스터로 쓰기 요청 전송
- rds_read.saesha.ca — 세 개(혹은 추후에 더 많아질 수 있는) 읽기 복제본으로 읽기 요청 전송
The ability to send read requests to multiple read replicas is an extremely powerful method of horizontally scaling your applications.
다수의 읽기 복제본으로 읽기 요청을 전송할 수 있는 능력은 애플리케이션을 수평 확장하기 위한 매우 강력한 방법입니다.
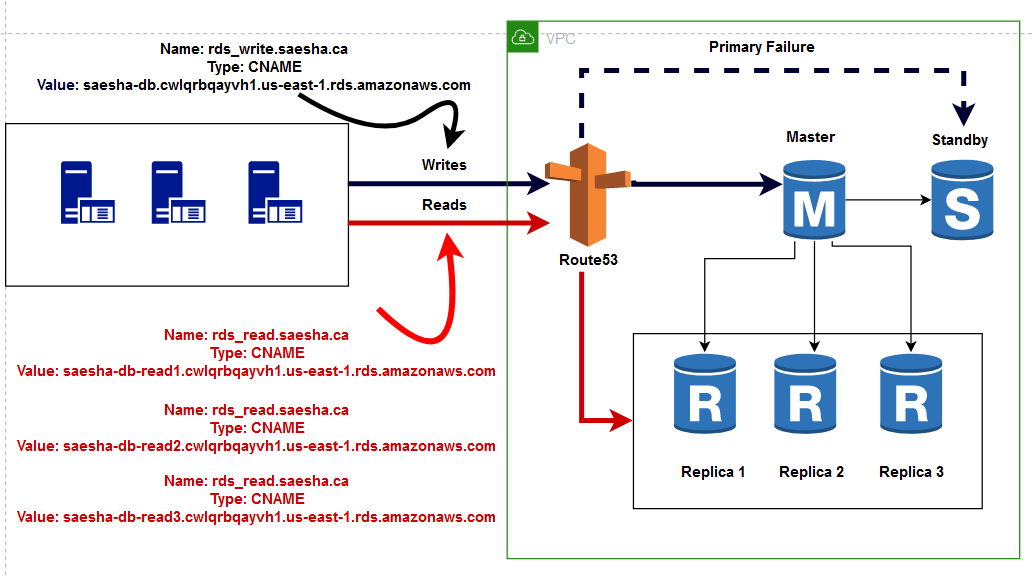
But there is a huge requirement for the above architecture to work:
The application/website should be capable of routing read and write requests to different destinations.
The problem is that many times it is not viable (time-wise) to modify an existing application or simply not technically possible at all. So in that case are we stuck or is there another alternative? Let's focus on the second option.
하지만 위 아키텍처를 사용하기 위해서는 중요한 요구사항이 있습니다.
애플리케이션/웹사이트는 읽기와 쓰기 요청을 서로 다른 목적지로 라우팅 할 수 있어야합니다.
문제는 여러번 기존 애플리케이션을 수정하는 것이 실행 가능하지 않거나(시간적으로), 기술적으로 절대 불가능하다는 것입니다. 이 경우에 우리는 방법이 없을까요? 아니면 다른 대안이 있을까요? 두번째 옵션에 집중해봅시다.
Option 2— What if the application requires high read scalability but cannot route read and write requests to different destinations?
On a recent project where we suggested the load balance architecture described above using Amazon Route 53. Unfortunately, the suggestion was shot down because of the way the application had been originally developed years ago. To attain a split of read and write requests meant rewriting almost the entire application. Fortunately, we were able to fulfill their request using ProxySQL without rewriting any part of the application.
Now here is a warning, ProxySQL is a viable option only if the back-end database is MySQL. Luckily a majority of eCommerce websites use MySQL, making this method a highly used alternative.
옵션 2 - 애플리케이션은 높은 읽기 확장성을 필요로 하지만 읽기와 쓰기 요청이 서로 다른 목적지로 라우팅할 수 없는 경우에는 어떻게 할까요?
최근 진행한 프로젝트에서 우리는 위에서 설명한 Amazon Route 53을 사용하여 로드밸런싱 아키텍처를 제안했었습니다. 불행히도 이 제안은 몇년 전 애플리케이션의 초기 개발된 방식 때문에 무산되었습니다. 읽기와 쓰기 요청의 분할을 하려면 애플리케이션의 거의 대부분을 재구현해야 했습니다. 다행스러운 것은 ProxySQL을 사용해서 애플리케이션의 모든 부분을 재구현하지 않고 그들의 요청을 수용할 수 있었습니다.
여기에는 한가지 주의할 점이 있는데 ProxySQL은 백엔드 데이터베이스가 MySQL인 경우에만 실행 가능한 옵션입니다. 운좋게도 대부분의 이커머스 웹사이트는 MySQL을 사용하므로 이 방법을 대안으로 많이 사용합니다.
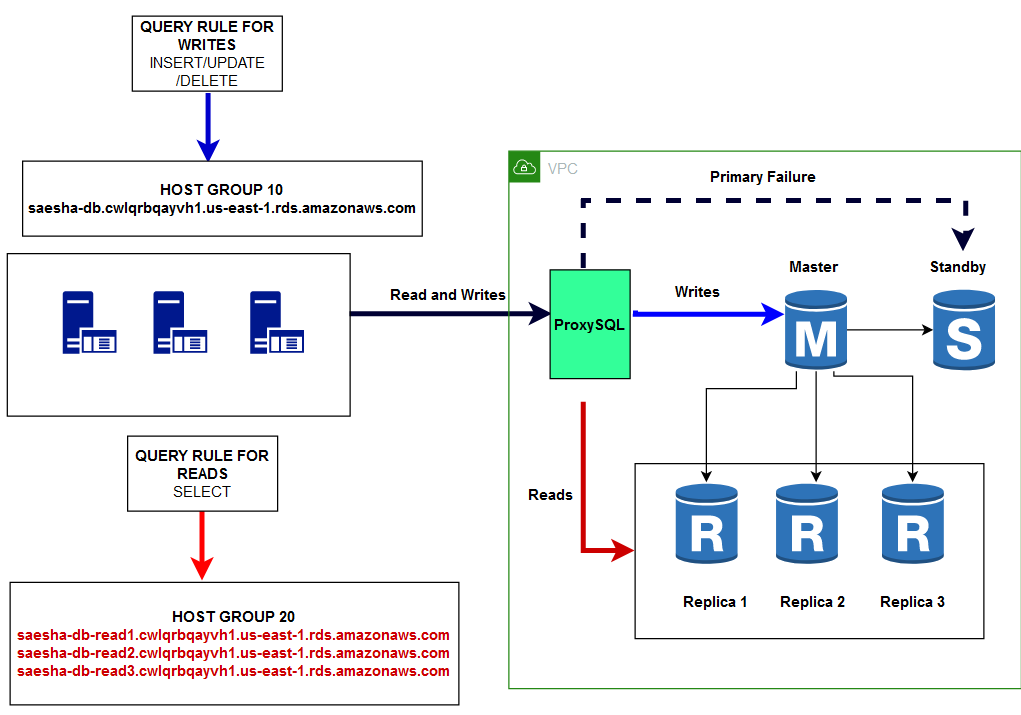
In the architecture above we have swapped Amazon Route 53 with ProxySQL. Essentially ProxySQL is a database that maintains the mapping SQL rules to their destinations. The process starts by creating host groups. As per the example above we have essentially created two host groups:
위 아키텍처에서 Amazon Route 53을 ProxySQL로 교체했습니다. 기본적으로 ProxySQL은 목적지에 대한 매핑 SQL 규칙을 유지 관리하는 데이터베이스입니다. 이 절차는 호스트 그룹을 생성하는 것으로 시작합니다. 위 예에 따라 기본적으로 두개의 호스트 그룹을 만들었습니다.
Host Group 10 — Writer Group — 1 member
saesha-db.cwlqrbqayvh1.us-east-1.rds.amazonaws.com
호스트 그룹 10 — Writer 그룹 — 1 member
saesha-db.cwlqrbqayvh1.us-east-1.rds.amazonaws.com
Host Group 20 — Reader Group — 3 members
saesha-db-read1.cwlqrbqayvh1.us-east-1.rds.amazonaws.com
saesha-db-read2.cwlqrbqayvh1.us-east-1.rds.amazonaws.com
saesha-db-read3.cwlqrbqayvh1.us-east-1.rds.amazonaws.com
호스트 그룹 20 — Reader 그룹 — 3 members
saesha-db-read1.cwlqrbqayvh1.us-east-1.rds.amazonaws.com
saesha-db-read2.cwlqrbqayvh1.us-east-1.rds.amazonaws.com
saesha-db-read3.cwlqrbqayvh1.us-east-1.rds.amazonaws.com
Once the host groups have been created you can map query rules (regex) to the appropriate host group by updating mysql_query_rules. Let us focus on a few example rules as under:
호스트 그룹이 생성되면 mysql_query_rules를 업데이트하여 쿼리 규칙(regex)을 적절한 호스트 그룹에 매핑할 수 있습니다. 아래와 같은 몇가지 예제 규칙을 살펴봅시다.
The following rule ensures all select queries (read requests) are sent to host group 20 that is load balanced using multiple read replicas.
다음 규칙은 모든 select 쿼리들(읽기 요청들)이 다수의 읽기 복제본을 사용하여 로드밸런싱 된 호스트 그룹 20으로 전송되도록 합니다.
^SELECT .* maps to host group 20
^SELECT .* maps to host group 20
The following rules ensure all queries other than select (write requests) are sent to host group 10 that has one member, the master
다음 규칙은 select를 제외한 모든 쿼리(쓰기 요청)를 마스터 하나의 멤버를 가진 호스트 그룹 10으로 전송되도록 합니다.
^SELECT .* FOR UPDATE maps to host group 10
.* maps to host group 10
^SELECT .* FOR UPDATE maps to host group 10
.* maps to host group 10
So you see how ProxySQL cleverly implements regular expressions to split requests. Using ProxySQL you can implement a far more sophisticated scheme to route queries not only based on their function but also based on their complexity.
이처럼 ProxySQL이 요청을 분산하기 위해 어떻게 효과적으로 정규표현식을 구현했는지 알아보았습니다. ProxySQL을 사용하면 기능뿐만 아니라 복잡성을 기반으로 쿼리를 라우팅하는 훨씬 더 정교한 체계를 구현할 수 있습니다.
I hope this article was helpful. The topic is covered in greater detail as part of the AWS Data Analytics course offered by Datafence Cloud Academy. The course is taught online by myself on weekends.
이 게시글이 도움이 되었길 바라며 이 주제는 Datafence Cloud Academy의 AWS 데이터 분석 강의의 일부에서 더 자세하게 다루고 있습니다.
More content at plainenglish.io. Sign up for our free weekly newsletter here.
더 많은 내용은 plainenglish.io에서 확인하시고, 무료로 제공되는 주간 뉴스레터에 가입하시기 바랍니다.